Wednesday, May 24, 2017

Adventure: Aleksander Doba, the Polish Kayaker Who Crossed the Atlantic (three times!)

I love stories of (some would say) crazy adventurers who take on, and often accomplish, goals so daunting it makes my longest paddles seem like a walk in the park. They harken back to days when famous explorers took on life threatening conditions because they didn't really have any other way to gain fame and fortune. We live in a modern world that has many advantages of comfort and relative safety, but sometimes I wonder if we've lost some of our vital spirit along the way. Fortunately, there are a few individuals who remind us by their epic adventures that the marrow of life is still available for those willing to risk and suffer to get at it.

Aleksander Doba appears to be one such individual. I read a post on Men's Journal from 2014 that recounts Doba's paddle across the Atlantic from Portugal to Florida. This was his second crossing, and he estimates that, due to his drift in currents, he paddled some 7,000 miles - this from a 67 year old man sporting a long, grey beard.

Now, I have no intention of embarking on anything vaguely close to the challenges Doba takes on (for example, he's the first person to paddle the length of the Amazon). However, he does inspire me to push my boundaries, and not to use the passing years as an excuse to grow ever more tentative. It reminds me of a great Anthony Hopkins movie, The Edge , where he tries to build Alec Baldwin's confidence for a looming battle with a predatory grizzly bear by repeating "What one man can do, another can do". Certainly not without preparation and training, but theoretically, yes - what what man can do, another can do.

Take a look at the Men's Journal post here:

Men's Journal - A Record-Breaking Atlantic Crossing by Kayak  

**UPDATE** He has now crossed the Atlantic solo THREE times - now at the age of 70. Read the story here Canoe & Kayak: 70-YEAR-OLD KAYAKER CROSSES ATLANTIC, KEEPS GOING   
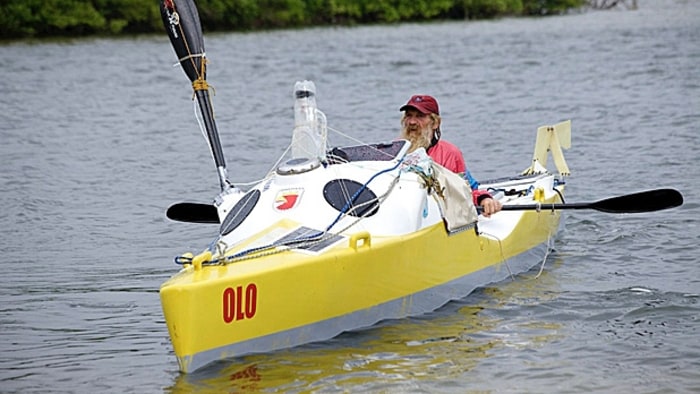

Aleksander Doba transatlantic kayak
Aleksander Doba -  Nicola Muirhead/@nicolaanne_photo 


Keep your spirit of adventure alive, and push your boundaries - no matter how close to home they may be.

- TB on the Water


Wednesday, May 17, 2017

Advice: The "Kmart Kayaker" - Why More People Are Dying from Paddle Sports

In my previous posts Safety is a Mindset and 10 Tips for Which Kayak You Should Buy, I mention the dangers of buying a "toy" kayak - by which I mean a cheap, poorly designed model sold at discount retailers. I recently ran across a post on GrindTV  that describes the buyers of these cheap models as "Kmart Kayakers". This term was used by Jim Emmons of the non-profit Water Sports Foundation, and I think it's an apt one. Jim describes a proliferation of discount retailer sold kayaks, and the access they afford to the water by untrained, poorly outfitted, and sometimes naive paddlers. WSF is working with the Coast Guard to address this issue, and I think that's a fantastic effort. Education of new kayakers and paddleboarders is key to saving lives.


“In the industry we call it the ‘Kmart kayaker,'” Emmons told GrindTV. “As kayak manufacturing processes were developed to make them less expensive, kayak brands found mass merchant places to sell them over the years.”

Take some time to read the full Grind TV post here: Why are deaths in paddle sports increasing?


As always, respect the water, and be safe. You will be rewarded 😁  


 - TB on the Water    

Wednesday, May 10, 2017

Adventure: Rock Gardening (it has nothing to do with dirt)

I have peripherally been paying attention to a kayaking activity called "rock gardening", which, like most things in the water, is much more advanced on the west coast then it is here in the east. However, I have run across some indications that could change. The general idea of rock gardening, as a kayaking sport, is to paddle on, over, around, between, and through rock formations on the coast or in open water. As you might imagine, this is probably not a good idea for the beginner, and could be highly dangerous if you didn't know what you were doing. That being said, the folks who do know what they're doing sure make it look like fun. 

I have noodled around rock formations a little bit, in a very conservative fashion - mostly because I've been by myself. This sport is something you would want to attempt only with like minded and experienced paddlers. A helmet is a must, and a solid roll will likely be required. My go to video on the subject is a group of rock gardening, and otherwise adventurous California kayakers who call themselves Neptune's Rangers. These folks look like they have a blast - and frankly, they have some serious backbone to play in the environments where they paddle. They also appear to have a ton of specific knowledge and great camaraderie - and (inspirational to me, anyway), they're not kids. Some of the folks on video appear to be well into middle age. I can only hope to maintain their sense of adventure and playfulness as I see the north side of 50.   

Here's a fantastic video of them doing their thing...


As you can see, they make rough water paddling look like it's second nature - they're completely at home in gnarly California coastal conditions. Kudos also to their video editor Roger Smith. He does a great job emphasizing the excitement. You can check out their website for fantastic advice on equipment and technique. 

As for us laggards here in the east, I did at least run across a very nice blog post on a first time rock gardening trip near Buzzards Bay in northern Rhode Island. This was written by Johna Till Johnson who describes her rock gardening adventure with Osprey Sea Kayak.

Here's a link to her full post - Where the Wild Rocks Are: Rock Gardening in Rhode Island   

So, if you're an experienced paddler and have a friend or two with similar inclinations, maybe rock gardening is a kayaking adventure you can try. Just be as safe as you can, do your research, learn some technique, and then, have an adventure. Who knows, maybe I'll see you there 😏.

- TB on the Water    

Wednesday, May 3, 2017

Environment: 2 Views of Human Impact on the Water

This post will be a short one. 

Recently, I was at the mouth of the Merrimack River in Newburyport, MA and I ran across two views of human activity that displayed our impact on waterways, and on the environment in general. Washed up on the riverbank (and very close to the open ocean) was trash of all sorts - but mainly bottles (mostly plastic, some glass). These had been lost, or more likely, discarded into the water or left on the beach for a high tide to wash away. As this is the mouth of a substantial river, some of the detritus could have floated downstream from several upstream communities.

Trash on the banks at the mouth of the Merrimack River
Washed up trash at the mouth of the Merrimack River

This trash ran on for 50 yards at least, with clusters of items every few feet. When I saw this, I thought of every instance of thoughtlessness each item represented. I was disgusted. 

Very close nearby, I noticed some sections of the dunes that had been roped off, and within these areas, grasses had been planted as part of a dune restoration effort. These efforts have become common along coastlines, and especially on barrier islands, which Plum Island is. The driving force behind these efforts is often as much about saving property (beach houses in this case) from the ever encroaching ocean and increasingly severe storms, as it is about improving the environment. Nevertheless, it is an example of humans working with nature to recreate natural environments that will benefit many species, including our own.
Grass plantings for dune restoration near the mouth of the Merrimack River, on Plum Island
Dune restoration grass plantings adjacent to the Merrimack River

Now, consider these two images of areas literally feet from each other. Then, think about the different motivations (or lack of motivations) that led to each result. It isn't hard to see which actions led to which conditions.

I'm confident the trash on the riverbank will be cleaned up before beach going season is in full swing in these parts. This particular area is popular with families and fisherman - who surf cast for striped bass. What I have no confidence in, however, is that the trash will be cleaned up by the same people who left it - or that more won't follow.  

Please, don't pollute. Don't make someone else, or something else, suffer the consequences of your actions. It's often easier to tear something down or apart than it is to build it. So, do the hard thing, do the right thing. Be part of the solution, not a source of the problem.

And, for all of you who are doing the right thing - thanks!

- TB on the Water


Wednesday, April 26, 2017

Gear: 8 Tips for Dressing Right for Your Kayaking Adventure

One question that comes up frequently when folks ask me about kayaking is "what clothing should I wear?". The answers have always seemed a bit obvious to me (and perhaps to experienced kayakers), but then, maybe they're not - and a discussion of the topic certainly can't hurt. I don't think it's necessary to spend a lot of money on high end gear, but the materials certainly matter. When it comes to extreme scenarios like very cold water, investing in a quality piece of clothing is essential to your safety. The most important concept to remember is that you are dressing for the water (even though you have no intention of swimming) as much as for the air. It can sometimes be challenging to be comfortable in the dry conditions, and yet still be prepared for an untimely wet immersion. So, here's some pointers on how to find the right balance:


1.The most important piece of clothing is your PFD. I know, your life jacket (personal flotation device) is not exactly a piece of clothing, but it is something you wear, and it is the single most important adornment you need for your safety. This is one of those items that is worth researching and spending some money on. Find one that is designed for the type of kayaking you will be doing, that fits snugly and can be tightened easily (LIKE THIS), and that remains comfortable when tightened while affording a full range of motion. Check the U.S. Coast Guard's guide to PFD selection. Find one that you like and wear it properly - always.  

2. Wear materials that dry quickly. The best way to keep warm is to keep dry. If you're wearing a cotton t-shirt and cotton shorts (or worse - jeans), you will not dry quickly and will be wet, and most likely cold (see my post "Florida Day" - Our Florida Paddle Adventure). Synthetic materials that are designed to wick away moisture work well in wet conditions. Make no mistake - drying off will make you colder. It's like sweating times ten, especially if it's windy. Getting dry quickly, however, will stop the evaporative cooling process and allow your body to regain its' proper operating temperature. A faster way, still, is to have a dry set of clothing safely stowed in a dry bag. A quick change is the fastest way to dry off and get your body heat back. You can dry your wet synthetic clothing under the deck rigging, then they can be your backup. I save money on this gear by sourcing it at discount retailers. Synthetic, wicking fabrics seem to be everywhere these days.            

3. Carefully consider your footwear. If you stay in your boat, and the most work your footwear has to do is rest on some pegs or push rudder pedals, then you can get away with a pair of water proof sandals (and no, I don't mean flip flops). How likely is that going to be the case? You might need to get out and walk on rocks or gravel, cross mussel beds or barnacles, drag your 'yak across tough marsh grass, or slog through ankle deep mud. Mud can suck the shoes right off you - so those water slippers you bought at ____mart will not cut it. I like to wear zip up wetsuit boots (LIKE THESE). The material stays relatively warm on my feet even when they're wet, and the snug fit keeps them on in the mud. I have a pair that also feature a rugged sole that can handle sharp edges like shells and barnacles. 

4. Wear a hat. On a sunny day you will be at the mercy of the sun's rays for extended periods. Your head (especially if you're getting a little thin on top like me 😉) will bear the brunt of the exposure. There are lots of styles available, but make sure the one you choose is made of quick drying materials, has a brim or visor of some kind, and has some method to stay on in windy conditions (like a drawstring chinstrap for instance). There are models available with flaps on the back to protect your neck, with bug netting attached, with a brim that can fold up to lessen wind drag...you name it. This is another item to consider carefully, and maybe to have a back up, in case yours blows away.  

5. Wear eye protection. The sun, the wind, salt water spray...all of it, can affect your eyes adversely. Water reflects the sunshine, and it can interfere with your vision - if a fast moving boat or jetski is moving toward you, that could be a safety issue. You don't have to shell out for expensive shades. Just get something that's UV rated, and get some kind of attachment (like croakies) that loops them on your head. I have mini-floats on mine in case I lose them - theoretically they prevent my shades from sinking, and I'll be able to locate the floats in the water by their bright yellow color. 
Floats that help keep sunglasses from sinking
Foam floats looped onto sunglasses
Buy cheap models so you can bring a backup pair.

6. Consider a drysuit. Ok, this is not an inexpensive proposition. A dry suit, when it works correctly, is designed to do just what it is named for - to keep you dry if you end up in the water. Why might you need one? If the water is cold enough, it can kill you - that's why (see my post Safety is a Mindset ). I wrote "when it works correctly" because the weak spot on a dry suit is the gaskets at the wrists, the neck, and the ankles (if booties are not attached). If any of these fail, water enters the suit - and you are not dry. These gaskets need to be maintained. Also, you'll want one with a front zipper if you're a guy. That way, you won't have to take it all the way off to do your business, if necessary. These cost at least several hundred dollars, so consider carefully what water temperatures you'll be paddling over before you decide to buy one. But remember - even moderate water temp's can send you into hypothermia if you don't get out of the water fast, and get dry fast. If you're planning springtime paddling, especially if you're going alone, you may want to purchase one. It could save your life. Do your research, and get a good model.

7. Consider wet suit separates. What do I mean by separates? Well, wetsuits come in full suits (all one piece - legs and arms covered), which I wear when I surf my waveski (see my post What's That Thing Called?). They also come in two piece arrangements, versions with short bottoms, sleeveless versions, and "farmer john" over-all type designs. You won't want a full wetsuit in case you need to answer the call of nature. Two piece bottoms can easily be removed, and "farmer johns" can be peeled down. You'll also want to pay attention to the thickness, which is measured in millimeters. 2mm is a relatively thin layer, 3mm and 4mm are thicker, and 5mm is for very cold water. If there are two thicknesses (usually thicker in the body, thinner on the limbs), there will be two numbers - like a 3|2 or 4|3 for example. Remember, wetsuits are named as such because you will get wet if you fall in the water. They are designed to keep you warmer while you are submerged, by trapping a layer of water against your body. The thicker the material, the warmer it will keep you. However, this does not mean you will be impervious to the cold water - it just buys you some more time. Once you're out of the water, you'll want to get the wetsuit garments off, and get dry asap. Recently, I went on a paddle where the air temperature was close to 80F, and the ocean temperature was around 48F. The water where I was paddling was a little warmer (outbound tide), so I'll estimate it at 58F. If I had been in a full wetsuit, I would have been baking in the sun. So, I wore a pair of drysuit pants and a 2mm wetsuit vest over a synthetic top. This way, I was not too hot in the sun, but I had a little insurance should I go for an unexpected dip. I had to wade through some water at one point, and the dry pant ankle gaskets failed - a good lesson to learn in a non-emergency situation. I'll have to revisit those pants to see if they're sufficient for future trips.

8. Wear gloves. Neoprene gloves can help keep your hands warm - very cold hands cannot properly grip a paddle. The main reason you'll want gloves in all weather, though, is to avoid blisters. A blister can make every paddle stroke torture, and can ruin your day. I recommend a couple pair - one for cold water, and an open/half fingers model for when it gets warmer (bring the cold water pair as a back up in case you need them).  

One additional item you might want to consider, although not a garment, that could increase your comfort level, is a seat pad. If you paddle for hours, and your backside has gotten a little bony with age like mine has, a seat pad can make a world of difference. I have a thin gel pad that I use. Just that half inch of gel between me and the kayak seat quite literally saves my ass 😅. 

Dressing appropriately for your paddle adventure is simply another act of preparation - like planning your trip (see my post Where Should I Paddle?) and maintaining your gear (see my post Kayak Repairs That Last). If you do it right, you'll be comfortable, confident, and prepared for the unexpected. Don't forget to wear a bathing suit underneath on a hot summer paddle - just in case your own private sandbar beach invites you for a swim. Just keep an eye on the 'yaks, or it will be a longer swim then you planned 😉.

- TB on the Water     


Wednesday, April 19, 2017

Travel: Plum Island Sound - A Natural Beauty

I have the good fortune of living in close proximity to a truly beautiful and protected body of water and adjacent lands defined by Plum Island to the east, and the Great Marsh to to the west. The body of water between the two is Plum Island Sound, which is the outlet of the Parker River, the Rowley River, and the Plum Island River (which also connects, via Plumbush Creek, under the Plum Island Turnpike Bridge, to the Merrimack River). Most of Plum Island, and a large portion of the marsh west of the sound is encompassed within the Parker River National Wildlife Refuge. According to their website, the refuge contains some 4,700 total acres, with 3000 of these comprised of marshland. This area is abundant with paddling opportunities (read my post Paddle Trip: The Plumb Island River from Plumb Island), and with some pretty amazing wildlife.


On a recent trip, Tim (see my post An Unexpected Adventure) and I spotted a roosting raptor that appeared to be a bald eagle, several seals hauled out on a dry patch of marsh (and with shiny, curious heads bobbing in the water to keep an eye on us 😉), multiple species of waterfowl, and possibly the strangest thing I've seen in salt water - a beaver. If you told me before this trip that beaver use marsh saltwater creeks to travel, I wouldn't have believed you - and yet, it swam nonchalantly right past the two of us. I've also seen deer, horseshoe crabs (ancient, alien looking creatures), and, until the beaver sighting, my most unusual salt water discovery: a snapping turtle. Keep in mind this is also an area known for arctic snowy owls and is a nationally recognized area to view migrating birds - especially at the nearby Joppa Flats.Then, there's the fishing. Striped bass are abundant in the sound when they're running, and bluefish and groundfish species (flounder, sole, etc) are available - primarily on the eastern side of Plum Island, which is open to the Atlantic.


Parker River National Wildlife Refuge

There are several kayak put-ins in the area, on the Parker and Rowley Rivers, on Water Street near Joppa Flats on the Merrimack River, and, for a fee, near the gate entrance to the Plum Island section of the wildlife refuge. The refuge itself has a gravel road that runs its' full length, and there's a state park at the southern tip with beach access. There are also boarded walkways off the road that provide access to views of the sound, or that meander through the dunes to the open ocean side.The refuge charges a per day fee, or you can buy an annual pass. You can also use your National Park pass should you have one. 

You can rent kayaks at Newbury Kayak and Canoe on the Parker River in Newbury, and also at Plum Island Kayak in Newburyport. Ask them about local conditions, though. Currents on the Merrimack River can be treacherous, and the mouth of the river is considered one of the most dangerous on the east coast. There's a Coast Guard station located near the mouth of that river because of the dangerous conditions (Newburyport is the birthplace of the USCG). Even the lesser rivers like the Parker and Rowley can have challenging currents depending on the tide. Explain your experience and comfort level and they should direct you where to go. Or, consider a group tour if it's available. 

With proper planning, the waters of Plum Island Sound offer a fantastic opportunity to paddle through protected coastal lands and waterways - and to view abundant wildlife. Birds of all kinds, seals, deer, fish, and possibly odd visitors like beavers or snapping turtles all make their home here. Wear bug protection, especially during the vicious "greenhead" fly season (see my post Essex Bay - A Northeast Massachusetts Gem), and bring a map - the various creeks can be visually confusing, especially at lower tides. 

Parking can get a little tricky midsummer, and for good reason. Folks recognize a good thing when they see it. But, don't be discouraged. With some persistence, the natural beauty of Plum Island Sound and its environs are there for your enjoyment. Afterward, you can explore Newburyport or Amesbury (farther upriver on the Merrimack) for a bite to eat and one of the many locally brewed beers (like the offerings at Silvaticus Brewery & Taproom)..

- TB on the Water   


Wednesday, April 12, 2017

Video: Extreme Sea Kayaking - incredible footage!

Have you ever seen someone doing something that you do - with such expertise and daring that you just have to shake your head in wonder? - like playing an instrument you can only noodle around with, with expert virtuosity...or elevating a dish you can cook competently to a mouthwatering masterpiece. It's fun to watch people performing at a level to which you can only aspire (and let's face it - you'll probably never approach). Kayaking falls in that category for me. I enjoy seeing kayakers expertly performing in conditions that send a chill down my spine just looking at them.

With that in mind, take a look at this footage I recently found on The Inertia showing Samuel Debiesse navigating his sea kayak through the Raz de Sein in Brittany, France. I've seen video of sea kayakers in this stretch before, but this point of view footage from his helmet mounted camera puts you right there in the action:


You might also note in the opening credits a kayaker and waveski surfer named Hugues Termeau. There's an incredible video of him waveski surfing Mundaka in northern Spain featured in my post What's That Thing Called? .

If you'd like to read the full story on The Inertia, you can find it here...

The Inertia.com - ONE OF THE BURLIEST SEA KAYAKING CLIPS EVER     

Let me know in the comments what your favorite kayaking videos are.


- TB on the Water  

Wednesday, April 5, 2017

Advice: 5 Tips for Touring a River in a Kayak

If you own a touring style kayak like I do, you are "restricted" to bodies of water large enough to accommodate 14-17' length boats. I put "restricted" in quotes because large bodies of water (lakes, the ocean, bays, etc.) are often anything but restricting in terms of area (conditions may be a different matter). You have plenty of room to turn, plenty of choices in direction, and plenty of depth beneath you. When it comes to rivers, however, those factors can be absent for some or all of the trip. That is why you should carefully choose where to put your touring kayak into a river. 

Rivers come in many forms - wide, narrow, fast flowing, slow meandering, fresh water, salt water...the list goes on. Dams may be present, tides may influence conditions far upriver (read my post Paddle Trip: The Merrimack River - from Rocks Village to Merrimacport), and even the cleanliness of the water can be an issue. How steep are the banks? Do you have anywhere you can get out of the water, or out of the way of boat traffic or the path of a floating log? For instance, kayakers sometimes brave the locks that grant access from Boston Harbor to the Charles Rivers, providing a unique urban kayaking experience. I have to admit, though, the thought of being in a lock, waiting for the water to rise, next to a 25' yacht gives me a sense of trepidation. I'd sure hate to get squeezed against the lock wall by a larger boat drifting in my direction (that doesn't mean I won't try it someday, though 😏).

There's a lot to consider if a river is on your wish list for paddle trips. That being said, a river can offer unique experiences that other venues cannot. You can follow a meandering river upstream into forest or farmland, and get a completely different perspective on areas you drove by or hiked through dozens of times before. Animals are often plentiful at river banks or in the water - deer, birds, turtles, fish...even alligators, manatees, and wild pigs in Florida. If the river is flooded beyond its' typical banks, you might get access to areas you otherwise could not paddle. A few years ago, Tim (see my post An Unexpected Adventure) and I paddled the stretch of the Concord River that flows past the Minuteman Statue and the Old Concord Battle Ground (map here). Paddling around that monument on still, flooded river water was an experience I won't soon forget. Later on the trip, we were able to paddle among flooded hardwood tree trunks - something more usual in cyprus swamps down south. It was a fantastic trip, and an example of the surprises that await you around each bend of a river.


A kayak trip on the flooded Concord River in Massachusetts https://cwkayaker.blogspot.com/2017/04/touring-river-in-kayak.html
Paddling the Concord River

Here's a few tips to help plan your river adventure:

1. Select a river or tributary wide enough for your kayak. If your kayak is of a touring style, choose a river wide enough to comfortably accommodate your boat sideways from bank to bank with enough clearance to turn fully in the opposite direction. Otherwise, you might have to get out on the bank, and lift/muscle your 'yak to turn it around before getting back in.

2. Choose a stretch of the river with calm waters. If you want to run rapids, then get a creek boat and a whitewater paddle and take the time to learn properly. Whitewater kayaking is a discipline unto itself, and is not to be taken lightly. There are serious safety concerns that require proper training and planning (read my post on Riptides and Currents). If you're not prepared for that, then scout a nice flat section, do your research to avoid rocks, dams, and choke points - and enjoy a leisurely exploration.

3. Be prepared to portage. "Portage" means, basically, to carry your boat. If you're paddling a shallow river, and hit a spot without enough water to keep from bottoming, then you'll have to get out and lead your kayak, or even carry it, to a deeper section. If you're not capable of doing that, then it's best to turn around and head back.

4. Paddle upriver first. Starting your trip by paddling upriver first will get the hardest effort done when you're at your freshest. Then, in the worst case, you can drift back downstream with the flow. I haven't always followed this advice myself, but trust me, on a long trip, it's sure nice to have the option to float back.

5. Go where the river leads you. Sounds simple, right? But what I mean is that rivers were the highways of this country before we had paved roads, and eventually paved highways. There's a really good chance the river you paddle was navigated in canoes by native peoples long before Europeans showed up. Even after we did, rivers were used as sources of industrial power, trade routes, water for agriculture...they were the lifeblood of our land. When you paddle a river, you are re-tracing history. You can travel them for a unique perspective on a city (like this tour in Chicago), or an exploration of a quiet, dark woods under overhanging branches, or to hear the wind shimmering through marsh grass on a brackish marsh river. 

Rivers can provide a great alternative to ocean paddling in the bumper seasons (see my post 5 Tips for Paddling in the Bumper Seasons) when ocean winds can get uncomfortably cold, or in the heart of summer when access to ocean side parking can be difficult. They offer another facet to your kayaking experiences, and a way for you to see the world you thought you knew with fresh eyes. I can remember slowly drifting around an oxbow bend on a wooded section of the Exeter River in New Hampshire (map here) to see a young buck deer with his nose in the water for a few seconds before he knew I was there, then watching him bound off through the trees on impossibly light hooves. I'll look at the world through those eyes anytime.

- TB on the Water 


Wednesday, March 29, 2017

Advice: 5 Tips for Kayak Fishing (once in a while)

Kayak fishing has grown into a popular subcategory of kayaking activities. Many folks who ordinarily would not be kayakers have come into the sport specifically to fish. The advantages of not having to purchase or maintain a powered boat, or to rely on paid excursions - plus the capacity to access areas where powered boats can't go is appealing to many fishermen/women. In most cases that results in the purchase of a fishing-specific sit-on-top kayak. These are wide, stable, built with multiple rod holder locations, and typically have some flat deck space to carry coolers, bait boxes, tackle boxes, etc. All of these features make sense if your primary intention for kayaking is to catch fish. Some of these fishing kayaks even come with an insert that fits a pedal driven propulsion system into the middle of the kayak - keeping hands free to manage a rod, while not needing to paddle for forward movement (great for trolling a few lines behind you as you go). The down side of these fishing-specific kayaks are that they are heavy, slow over long distances, expensive (depending on how they're fitted out and whether used or new), and probably not "rollable" - if you tip over, you will have to climb back on board, and getting that heavy kayak reoriented will not be easy. This could be a safety issue in very cold water (see my post Safety is a Mindset).

But, what if you're only interested in fishing from your kayak "once in while"?. I have done so on several occasions, accompanied by my kayak fishing partner in crime, Mike. Mike has the full fishing-specific rig (minus a propulsion system - he just paddles), which comes in handy for holding an extra rod I can use, plus a cooler on his back deck. I am on my Sea Dart sit-on-top kayak most times, but have also been inside a closed hull touring style sea kayak (see my post Which Kayak Should I Buy?). How do I manage that? As I mentioned, I have the good fortune of fishing with a true kayak fisherman, so I can take advantage of some of the features of his boat. However, I use some tactics that could be helpful for the kayaker who does not have the benefit of such an arrangement:

1. How are you going to transport your fishing rod? This may seem simple, but it's not. It's not a good idea, in general, to get your reel wet with salt water. It's going to happen at some point, but minimizing that occurrence, and keeping your reel from getting dunked, if possible, is a good idea. You can stow your rod underneath deck lines, you can have it partially disassembled inside your cockpit, or you can stow it disassembled in your dry storage/flotation compartments. All of these are reasonable choices, but all of them make accessing your fishing rod difficult when you're on the water. You would be best to stop somewhere to get your rod set up, then proceed back onto the water (maybe with the exception of the deck line storage). Otherwise, you're looking at installing a fishing rod holder assembly.

2. How are you going to hold/manage your fishing rod while paddling? This is where real decisions have to be made. Fishing rod holders come in various designs that include deck mounted options, or options that penetrate the deck and reside inside the cavity of the boat. Each has it's advantages and disadvantages, not the least of which is adding penetrations through your deck - either with the screws or the holder itself. These can be leak points, and need to be sealed thoroughly when the rod holders are installed. Some deck mount assemblies have a couple of parts to them, so most of the assembly can be easily removed when it's not needed. Some deck mounting systems are modular, so you can attach something like a cup holder instead of a rod holder when you want to. How often you will be fishing, and what type of rod holder is right for you deserves consideration. The simplest method, which I have used, is to unbuckle the top buckle of your PFD (life jacket), and slide the rod handle inside the front. This can work if your PFD fits snugly - but take caution to keep the reel away from your face with the handle away from you, so it doesn't whack you if you get a bite. And remember, if you do go for a rod holder make sure to mount it where you can comfortably reach it from your seated position. Sit in or on your boat and play with the motions of releasing your paddle and grabbing the rod handle to (hopefully 😏) reel in a fish. This will help you properly locate the rod holder, so you don't mistakenly create any unnecessary deck penetrations.     

3. What will you do with your paddle? You only have 2 hands, which will both be required to reel in a fish - one to hold the rod, the other to turn the reel handle. So, no hands will be available to hold your paddle. If you have a dependable paddle leash, you can just toss your paddle into the water, and pull it back in after you have the fish caught (and released most times - be a good steward). If you're dexterous, you might be able to slide your paddle blade under deck rigging before attending to your bent rod and spinning reel, but you have to be quick - a big striped bass can pull you on a "sleigh ride", and maybe even pull you off balance. I like having my paddle quickly accessible to deal with any unforeseen issues, like getting pulled into a boat lane for instance. So, you might want to consider a paddle holder system. Like rod holders, there are many designs and configurations - just make sure anything screwed in gets sealed, and that your paddle is held securely, but still easily retrievable. 

4. Where will you keep additional gear? Sure, you can stow tackle, bait, pliers, a knife to cut line, and any other gear that makes baiting a hook, or getting the fish off your hook, possible in a storage compartment. But, will you have easy access to these items when you need them? You will need them secured to your boat, but accessible - which probably calls for some kind of deck bag storage. Most deck bags can be rigged to your deck lines temporarily - so they won't be in the way when you don't need them. As with the rod holder location, play with your deck bag location to see what works best. You might want it closer to you than you'd otherwise think, to make for quicker access to items as you need them.

5. Understand that you have added complexity. Paddling a kayak in ocean or river conditions can be challenging enough. Adding the complexity of managing a fishing rod, casting your line, abandoning your paddle temporarily, unhooking the fish for release - all without catching the hook on your earlobe...well that's another level altogether. Maintaining balance and your location awareness should you hook a big one is a new kind of challenge. But when you get that fish in, and realize you were much closer to the action by being right on the water, you'll know why you came. Just take the time to think it through beforehand, and set your gear up in a way that makes sense. Then, you won't have to think about it when you're in the middle of that "sleigh ride", and you and the fish can meet somewhere in the middle.

I'm not a big fisherman, but I do like to take the occasional fishing excursion with my kayak. It adds another dimension of enjoyment to the overall kayaking experience. I will never be able to manage more than one line in the water at a time with my boat, but that's OK with me. Truth be told, most of the time kayak fishing is a reason for Mike and I to get together out on the water. Trolling lines through a wide marsh river for stripers is a great excuse to watch the birds, listen to the wind, and watch for that rod tip to bend. If it does, then the real fun starts - even with "schoolies" like this one... 


Catching a small striped bass on the Hampton River in New Hampshire https://cwkayaker.blogspot.com/2017/03/kayak-fishing-once-in-while.html
Catching a "schoolie" sized striper on the Hampton River


- TB on the Water       


Wednesday, March 22, 2017

Travel: Essex Bay - A Northeast Massachusetts Gem (but where's the parking?)

If you're lucky like me, you live near natural resources that offer sublime experiences without the hassle of a long drive to get there. Essex Bay, situated just north of Cape Ann and Massachusetts' north shore is just such a place. It lays at the mouth of the Essex River, and is protected from open ocean by Crane Beach (a gem of its own). Bordered by the towns of Essex, Ipswich to the north, and Gloucester to the south, Essex Bay is a paradise for boaters, fishermen, and of course, kayakers. (Google map of Essex Bay )


View of Choate Island, Essex Bay Massachusetts https://cwkayaker.blogspot.com/2017/03/essex-bay-northeast-massachusetts-gem.html
Choate Island with Essex Bay beyond

Some of the features of kayaking on Essex Bay are myriad marsh river waterways, sandbars that appear at lower tides and offer your own temporary private beach under a vast blue sky (just watch your boat, so it doesn't float away from you on a quickly rising tide), and Choate Island (also known as Hog Island) - a filming location for the movie version of The Crucible . Boat traffic can be busy in and out of the main Essex River channel, but there's plenty of space for shallow draft boats like kayaks to explore at their leisure. Striped bass run when the season's right, so you can cast your line from your kayak, or from the shallows to test your luck (with a salt water license in hand, of course 😏). Afterwards, you can feast on the local fried clams or a bucket of "steamers" at any one of several clam shacks in the area.

For those who don't own a kayak, or are just beginning to explore the sport, Essex River Basin Adventures offers tours and training. In fact, one of the first times I paddled a kayak was on one of their tours. That was about 15 years ago, so it looks like the early impression was a good one. The first kayak I purchased was one of their post-season used models - and they even delivered it. I would highly recommend them to anyone who's interested in the occasional kayak adventure, or investigating the sport to see if they like it - and you can do that surrounded by truly beautiful scenery. However (and they'll probably tell you this), there are times of year when you will need to be prepared for the murderous "green head" flies. If you've never had a chunk of flesh bitten off you by one of these evil, and seemingly impervious to blows, vampires, you will be shocked by how much worse it is than a mosquito bite or other fly bite. If you have been bitten by one, then you know exactly what I'm talking about. Wear proper clothing and use DEET.     

The one thing that Essex Bay lacks, in my opinion, is easy access to the water. I know, the locals would say that's what the public boat launch is for. The problem with the boat launch (located right off Rt. 133 in Essex), is that the river is narrow at the start, and stays that way for a little while until it opens onto the broader bay. Boat traffic can be heavy during the summer on that river - to and from the boat launch. Even assuming that all motor boats follow the no-wake rules, you will spend significant time dealing with wake waves in a narrow channel. This raises the danger level for paddlers - who could find themselves exposed to boating accidents like this one. Plus, it will add 20 minutes (40 minutes including the return) to your paddling time out to the bay. I have tried to work around this by finding other launch locations - not all "officially sanctioned" locations I should add. I am hesitant to push my luck, though, as the last thing I want is to return to an empty spot where my towed-away truck used to be (see my post Which Kayak Should I Buy? for additional considerations).

Conomo Point is a popular launch area for kayaks - if they are being dropped off. Parking near the water is non-existent. There used to be 3-5 parallel spots available on the return side of Conomo Point Road, across from Beach Circle that those "in the know" could use. For the past couple years, however, "resident sticker only" no-parking signs have restricted parking to the arrival side, about 1/3 of a mile from any access to the water. This requires wheels (like these) to get your kayak to the nearest beach launch, and don't get there too late, or the parked cars will be backed up for quite a ways. It makes getting your kayak into the bay that much harder - and to my mind, seems most unwelcoming. I, for one, don't understand why the town of Essex wouldn't encourage easy access for kayakers to Essex Bay, who might, you know, end up spending some money while they're in town. I'm even reminded (by contrast) of a restaurant in Portsmouth, New Hampshire (on Sagamore Creek) that lets kayakers pull right up on their beach and grab a bite during the trip (I'll have more on that in a future post). 

Despite the challenge of getting access to the water, Essex Bay is worth the effort (see my post Paddle Trip: Choate Island and Crane Beach). Once I'm on the water there, I'm in another world that is less than an hour from my house. The sun, the salt air, the tall white dunes on the bay side of Crane Beach, the view of the colonial farmstead on Choate Island - this is a quintessential New England experience, and shouldn't be missed. If you only do it once - do it anyway. You'll thank me.

For a bonus tip - avoid the long lines at the touristy clam shacks and sidle up to the bar at the Choate Bridge Pub  in Ipswich. You can hang out with the locals, and order up fried clams that are as good as anything you'll get at the more well known joints. Wash them down with a pitcher of Ipswich Ale - brewed a couple blocks away (fresh is best 😋), and you will have fully experienced the delights of this stretch of the Massachusetts coast, and one of the oldest populated places in the country. You'll be salty, sun bleached, and well fed & watered - all in all, happy as a clam 😊.


- TB on the Water